Showing posts with label Tutorials. Show all posts

Thursday, 2 May 2013

How To Setup A WordPress Blog In 5 Minutes

WordPress.org is one of the most famous self hosted blogging platforms. To start a WordPress blog, you require 2 things - a domain and a web hosting account.

In the earlier articles of our "How To Start A Blog" series, we had discussed about registering a domain name and also about 3 of the best web hosting providers for a WordPress blog.

Setting up a WordPress Blog

In this tutorial, we will take Hostgator as an example, and install a WordPress blog with a hostgator account.

Hostgator allows you to install WordPress by three methods:
  1. Manual
  2. Fantastico
  3. Quick Install
Out of these, Fantastico is the easiest method to install WordPress.

Login to your Hostgator web panel. Under services/software, click on Fantastico.

Installing WordPress

From the left sidebar, select WordPress under the 'Blogs' category. Then select 'New Installation'.

Now select the domain you want to use with your WordPress blog. You can choose either to install WordPress on root directory eg- www.bloggingpanorama.com or to install WordPress on sub directory eg- www.bloggingpanorama.com/blog


Check every detail and then press 'Install WordPress'.

On the next screen, you will be shown your database details. Note it down somewhere and click 'Finish Installation'.

Thats it!

Now you would get the confirmation about the newly installed WordPress blog.

Congrats on Starting Your Blog!

Congrats
credit- sporttaekwondo.org
The first part of our "How To Start a Blog" series ends here..

By now, you are ready to start your blog. But what to do after starting a blog? Be sure to read this post about a 'to-do list' after starting a blog.

And there will be many more articles to guide you on starting a successful blog.

So stay connected with us... You can also subscribe to our email newsletter to get updates on the latest posts published here.

Any doubts?

If you face any problems installing WordPress then do comment and let me know.

Thursday, 18 April 2013

Creating A WordPress.com Blog In 2 Minutes

This article is a part of "How to Start a Blog" series.

In the previous article, we had discussed about two of the most preferred blogging platforms for creating a free blog - Blogger and WordPress.com

If you have chosen to start your free blog with WordPress.com, then for you, this is an article that helps you create a WordPress.com blog in just 2 minutes.
Create a WordPress.com Blog

So let's get started!

Step 1 - Creating a WordPress.com Account


Visit WordPress.com and click on 'Get Started' to sign-up for an account. You will be asked your email-id, choose a username that is available and if you want, then you can choose a domain name for your new WordPress.com here itself.

Create a WordPress.com Blog

And if you want to skip choosing a blog address, then just click on 'signup for just a username' on the right side of the screen, next to the 'Blog Address' field.

After all the details are entered properly, click on 'Signup'.

All this takes only 1 minute.

Step 2 - Confirming the Account and Starting Your WordPress.com Blog


A confirmation link would be sent to your email-id that you used to sign-up for the WordPress.com account.

Follow the link to confirm your account.

Congrats! Now just login to your newly created WordPress.com account and you are ready to create your WordPress.com blogs!

If you didn't enter a blog address at the time of sign-up, then you can start creating your own blogs, by clicking on the 'Create a New Blog' link in the 'My Blogs' tab.

Create a WordPress.com Blog

Here, you will have to choose a blog address and choose a nice name for your blog. Tips for choosing a blog address are similar to the tips to choose a domain name for eg - keep it small and clean, easy to remember, related to your topic, etc.

Now at the bottom of the form, you would find 3 different plans to choose from. Here, we are discussing about creating a completely free WordPress.com blog, so choose the 'Basic' plan, which is completely free.

Now click on Signup and you are done! All this in just 1 minute...

Congrats!

You are done with creating your first WordPress.com blog! And that too within 2 minutes! ( If your internet speed favors you ;) )

So how was it?

Did the article help you? Would you like to share about your blog here?

Fell free to comment and share your views!

And happy blogging...

And do check out my "How to Start a Blog" series if you are planning out your first ever blog.

Wednesday, 17 April 2013

Creating A Blogger (Blogspot) Blog in 3 Minutes

This article is a part of "How to Start a Blog" series.

In the previous article, we had discussed about two of the most preferred blogging platforms for creating a free blog - Blogger and WordPress.com

If you have chosen to start your free blog with Blogger, then for you, this is an article that helps you create a Blogger (Blogspot) blog in just 3 minutes.
Create A Blogger Blog

So lets get started!

Step 1 - Creating a Google Account


Don't worry, it is nothing like a bank account or anything tricky. 

Most of you would already be having an account created by now. Even if you had signed-up for gmail, it means that you have created a Google account that can be used with Blogger too. In this case, skip this step.

If you have never created a Google account, then just go to Blogger.com and click on Sign-up. Fill in the required details and your account would be ready in 1 minute.

Step 2 - Creating a Blogger Profile


Again a simple step.

Just login to Blogger.com with your newly created email id and password. After signing in for the first time, you would get a screen similar to below:

Create A Blogger Blog

This screen lets you decide whether you want to create a Google+ profile or use a limited blogger profile for your blogs. A profile here, is similar to any social networking profile like Facebook or Twitter. It would contain a short bio about you and would contain your photo so that people can know about the author (you) of your blogs.

I recommend anyone to create a Google+ profile here, because it takes just 1 minute and it works as a great platform for sharing your blog and blog articles. You will realize about the importance of Google+ as you continue your blogging career.

Step 3 - Creating The Blog...


OK. So now all the necessary formalities of sign-up are completed and you can start creating your own blogs now.

Create A Blogger Blog

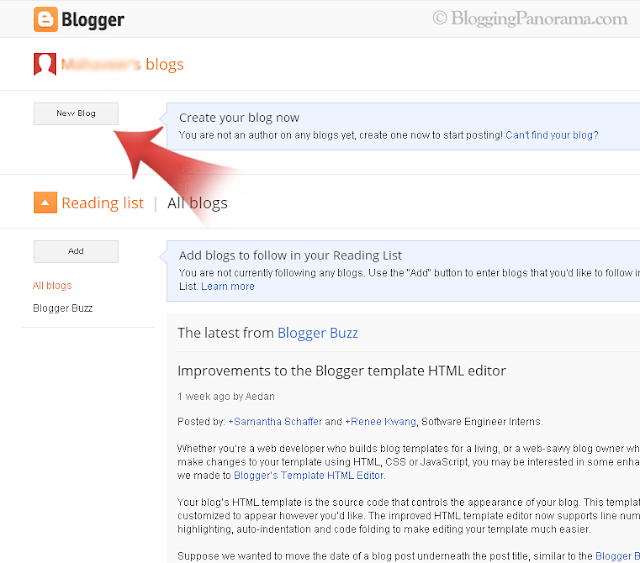
The screenshot above shows the first page that you would run into after logging in. Find the 'New Blog' button on the left side of the screen and click on it.

Create A Blogger Blog

This will open a screen as shown above.

Here, you will have to fill the name of your going-to-be blog and choose a suitable sub-domain for it that is available. The sub-domain along with the '.blogspot.com' would be the web address for your blog. Eg - sampletestblog11.blogspot.com is my chosen web address (screenshot). Tips for choosing a sub-domain would be similar to the tips to choose a domain name for eg - keep it small and clean, easy to remember, related to your topic, etc.

If you have bought a domain name and want to set-up this blog on your custom domain, then also you will have to choose a sub-domain temporarily. And after setting up the blog, you can move your blogger blog to custom domain.

Choose a theme template for your blog (You can change or edit the theme anytime in future) and click on 'Create blog!'

Congrats!

You have created your Blogger blog! And that too within 3 minutes...( If your internet speed favors you ;) )

Now look at the screenshot below:

Create A Blogger Blog

You would get such a screen after successfully creating your Blogger Blog.

Now you can write blog posts on it, edit its template, settings and everything else. Your blog is now ready!

To see how your newly created Blogger blog looks like, just click on the 'View Blog' button shown in the right side of the screen or type your blog's web address on your internet browser's address bar.

So how was it?


Did the article help you? Would you like to share about your blog here?

Fell free to comment and share your views!

And happy blogging...

And do have a look at my "How to Start a Blog" section if you are planning out your first ever blog.

Friday, 12 April 2013

How To Start A Completely Free Blog At Zero Cost

This article is a part of the "How To Start A Blog" series of tutorials. 

If you’re reading this article than most probably you’re on your way towards starting your own blog. I had mentioned in the earlier article that you can create a blog either by investing a little amount of money or even at zero cost. 

This article deals with starting a completely free blog i.e. at zero expense.

Free

There are many blogging platforms that will let you create a blog without any charges. Two such blogging platforms that are used worldwide and are most famous are Blogger and Wordpress.com 

(Note- there are two different versions of WordPress namely Wordpress.com and Wordpress.org out of which Wordpress.com is a completely free one. Creating a Wordpress.org blog requires a little investment about which more information will be available in my upcoming articles.) 

The Basic Idea Behind “Free” Blog 

You would be wondering how these two blogging platforms our completely free, wouldn't you ? 

So here is the basic funda behind these two platforms. By now you would be familiar that creating a blog or a website requires two things- a domain and a hosting

Blogger and Wordpress.com offer a free sub-domain of their sites blogspot.com and wordpress.com respectively. That is why blogs created on these sites have a web address like xyz.blogspot.com or xyz.wordpress.com 

So this solves the problem of getting a domain. Now the only thing that you need is hosting. 

And yes, let me make it clear that getting a sub-domain from these sites is not a compulsory choice because you can also buy a domain name yourself and use it with blogger and wordpress.com but as far as this article is concerned we’re talking about creating a blog at zero expense. So getting yourself a sub-domain from these sites is the best choice. 

Also be sure not to fall in the scams related to free sub-domain registrars. 

The second thing needed is hosting and fortunately both blogger and wordpress.com offer free hosting on their own servers. 

Benefits Of Starting A Completely Free Blog 

If you’re completely new to blogging then it would be better to try out your newly learned basics on a free blog. I don't want to make you worry but it is a simple truth that most of the bloggers fail to get any success with their first blogs. I don't want any of my readers who are going to be bloggers to quit blogging with a loss. 

And that is why I recommend every new blogger to first of all experiment with a free Blogger or Wordpress.com blog. 

And that is what actually even I did. I started my first blog on the Blogger platform on their free sub-domain. And eventually when my blog started making money, I purchased a domain name for it. 

Disadvantages Of Starting A Free Blog On Free Sub-domain

The only disadvantage that I've noticed with a free sub-domain is that people don’t take you seriously. People think that you are not serious about your blog. 

Unless you buy yourself a domain name for your blog, people recognize your blog as just another free Blogger or Wordpress.com blog and not as some author’s blog. You do not get your own brand, your own identity unless you buy at least a domain name for your blog. 

But still I recommend trying out an experiment blog on either Blogger or Wordpress.com platform. Just to get the primary practical knowledge and experience about blogging. And once you gain confidence and think that you can maintain your own blog, just go for spending some money for the blog. 

So far in this article we have discussed about platforms for starting a free blog, its merits and demerits. 

Now let us move on to creating a completely free blog. 

But wait! Which free blogging platform should you use? Confused? 

Then just read this article – Blogger vs Wordpress.com 

After reading this article about Blogger and Wordpress.com, let us move on to starting a free blog on either platforms. 

If you have decided to go with Blogger, then read this tutorial for creating a Blogger blog.

If you have decided to go with WordPress.com, then read this tutorial for creating a WordPress.com blog.

What Do You Say? 

Have you ever started a blog on the free sub-domains on blogger or wordpress.com? How was your experience? Do comment and share your views with me and our going-to-be-blogger friends.. 

And feel free to ask any question arising in your mind. Your suggestions are also welcome…

Saturday, 10 November 2012

Pinterest: How to Create a Secret Board

For those who are unaware of Pinterest, it is a social networking sites based on sharing photos (pins here). Photos are pinned into boards created by the user and that's why it is named Pinterest.

Pinterest Secret Boards
Source: Pinterest Blog
Pinterest has introduced a new kind of board for users that can keep their pins secret and hidden from public. The secret board is just visible to the creator himself and the people whom he invites. Currently, a user is allowed to make 3 secret boards.

Read the post on Pinterest blog about the announcement of secret boards.

Pinterest users like me got an email notification about this latest update. Here is a small part from the email notification-

Over the last year, there have been so many ways, big and small, that the Pinterest community has made my life better. I’m happy to say that I’m not alone. We’ve heard from teachers who use Pinterest to plan lessons, chefs who share recipes, and museums that pin their archives. We've also heard from millions of people who’ve been inspired to pick up an old hobby or try something new. It’s honestly more than we ever expected when we started Pinterest. We’re humbled to be part of such a positive, warm and creative community.

Today, we’re excited to continue this tradition with a new feature we hope will make Pinterest even better—secret boards. Secret boards give you a place for things you’re not quite ready to share yet, like a surprise party, special gift ideas, or even planning for a new baby. We’re testing out the feature by giving everyone 3 secret boards. You’ll find them at the bottom of your profile. We can’t wait to hear what you think!

On behalf of our team here at Pinterest, thanks so much for pinning, inviting your friends, and sending us ideas for how we can improve. Most of all, thanks for sharing your inspirations. With your help, we’ll make Pinterest a little better every day.

—Ben & the Pinterest Team

Now let us move on to creating our first secret board...

A secret board can be created like any other board. Actually keeping a board secret is just like an attribute only.

On the top right corner of your Pinterest profile, click on the Add+ button, then select Create a Board.
How to Create a Secret Board on Pinterest
Set the Secret button to ON. Enter the name and category of board and click on Create Board.

What would be the benefit of creating a secret board?

Creating a secret board can prove helpful if you are planning something secret and don't want the public to know about it now. Like if you are planning a campaign, it would help in managing future pins.

What do you think?

What do you think about this new feature introduced by Pinterest? Will these secret boards be helpful to you? Any ideas on it?

Do comment and share with us! And do follow us on Pinterest: @BloggingPanorama.

Monday, 5 November 2012

How to Redirect Blogspot Blog to Custom Domain

redirecting blog

This is the second part of my tutorial on setting up a blogger blog on custom domain.

Read the first part here: Setting up Custom domain for Blogger.

In this part, I am going to guide you to on redirecting your old blogspot.com blog to your custom domain.
Eg: From yourblog.blogspot.com to yourblog.com

Second, I will guide you in redirecting naked URL (non www URL) to the www URL. Then I will guide you in updating your site links and other services to work with the new domain. I hope you have followed the part one and set up the CNAME and A records you need for your blogger blog to work on the custom domain.

Redirecting Blog to Custom Domain

  1. Go to Blogger dashboard > Settings > Basic > Publishing > Blog address
  2. Click on 'Add a custom domain' > 'Switch to Advanced Settings'
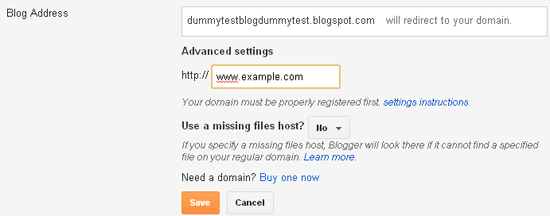
  3. Enter your domain name with a 'www' as shown in the screenshot below. Eg- www.example.com
Redirecting Blog to Custom Domain screenshot

Set the 'Use a missing files host?' option to no. Select save and you are done!

Redirecting Naked URL to 'www' URL

Naked URL is the URL that doesn't contain a 'www' in it. Suppose you have registered a domain named example.com and then by following the above method, you set up your blog on that domain. Then there is still one problem left to solve. Because after successfully setting up your blog on custom domain, you can access your blog by the URL: www.example.com but if you enter the URL as just example.com then it would show a 404 error.

There are many users who do not enter the 'www' prefix and so they will not land on your blog, but will land on a 404 error page. To solve this problem, we need to redirect the non-www URL (known as naked URL) to the www URL.

Follow these steps to redirect the naked URL to the correct URL.
  1. Again go to Blogger dashboard > Settings > Basic > Publishing > Blog address
  2. Click on Edit > Check the option 'Redirect yourblog.com to www.yourblog.com'
Click on save. That's it!

Editing Site Links and other Services

After redirecting your blog to custom domain, the internal links within your blog do not change automatically. You need to change them manually.
  1. Check for internal links on any blog post and correct it.
  2. Open you blog's HTML template and search for your old blogspot.com links and manually change them to the new link with the 'www' prefix.
One important service that most of you would be using on your blog is Feedburner. Go to feeds.feedburner.com and edit your feed settings to the new blog address and the new blog's RSS address.

I should also remind you about some other places where possibly you have placed a link to your blog.
  1. Facebook/Twitter/LinkedIn or other social networking sites.
  2. Forum signatures.
  3. Reciprocal link exchanges. You can send an email to the other blog owner to update the link.
You won't be able to edit commentluv comment links on other blogs. But don't worry about it because the old blogspot.com links would be redirected to the new blog's address. Also in a few days, after Google re-indexes your new blog's URL, you will get back all the backlinks even if they link to the old blogspot.com blog.
In this process, you will lose your PR and Alexa rank but you will eventually gain them back without any special efforts.

Image credit: sheelamohan/FreeDigitalPhotos.net

Over to you!

Did the tutorial help you? Or do you have any doubts on this process? I would love to hear from you so do leave a comment.

Saturday, 3 November 2012

Setting up a Custom Domain for Blogger

This is the first part of my 2 section tutorial on setting up a blogger blog on custom domain. In this part I have discussed how to set up A records and CNAME records for the custom domain to use it for your blogspot blog according to the newly updated features and settings by Blogger.

After buying a custom domain for your blog, the next step is to set up CNAME and A records for it. Recently (in October 2012) Blogger had faced some issues regarding mapping a custom domain for its blogspot users and after that, they had introduced a new CNAME record to verify the ownership of domain.

OK. So let us move on to these settings. I have divided the settings in 2 parts. The first part is divided into two parts according to your registrant. That is because in Godaddy, these settings are easier compared to other registrants. The second part deals with the 2nd CNAME record required as per latest update by Blogger.

Part 1: Setting A records and 1st required CNAME record


Option 1: For domains registered through Godaddy:

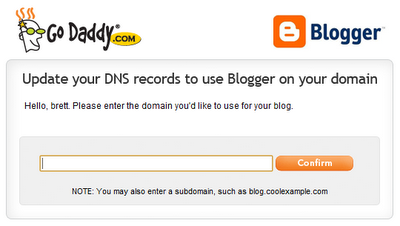
Go to your account domain setting tool and enter the domain name you want to set up for blogger as shown in the figure below. In 10-15 minutes, the account will be half ready for blogger.
Godaddy domain setting tool for Blogger
I said half ready because still there is one more CNAME record remaining to add. Now jump to Part 2.

Option 2: For domains registered through Namecheap, name.com or other registrants:

For other registrants, you will have to manually set up A records and CNAME records.

These are the required A records:
@     216.239.32.21     1800
@     216.239.34.21     1800
@     216.239.36.21     1800
@     216.239.38.21     1800
Here 1800 is the TTL (Time to live)

And this is the 1st CNAME record you need to enter:
www     ghs.google.com

Now move to Part 2 to create the 2nd required CNAME record

Part 2: Setting 2nd required CNAME record

Go to: Blogger Dashboard > Settings > Basic > Blog Address > Add a custom domain

Now click on 'Switch to advanced settings'.

New CNAME Record Settings for Blogger

Enter your domain name with www like www.example.com (as shown above). Now click on settings instructions.

You will be taken to a page of instructions. First select 'On a top-level domain (www.example.com)' option. Now find the second CNAME record details and note it.

CNAME records blogger

Now open your registrant and go to account domain settings and manually enter the 2nd CNAME record as given in the instructions page. Note that in some registrants like Godaddy there is no need to (and you cannot) add the last dot (.) given in the CNAME destination eg "xyzabc.domainverify.googlehosted.com." There is no need to add the last dot so just type "xyzabc.domainverify.googlehosted.com" in the CNAME destination.

Congrats! You have completed the required tasks to set up a custom domain for blogger. Now wait for nearly one hour for the settings to show their results and then move to the next step of setting up blogger on custom domain.

Read the second part of the turorial: How to Redirect Blogspot Blog to Custom Domain

Tuesday, 30 October 2012

How to Set up a Blogger Blog on Custom Domain

As we all know, Google's Blogger (also called Blogspot) is an extremely easy to set up and easy to manage free blogging platform. After WordPress, Blogger is the most famous platform for blogging. A lot of new bloggers on their first try at blogging, create a free blogger blog.

There are many advantages as well as few disadvantages of using Blogger as a platform instead of WordPress. When you start a blog with Blogger, you get a free subdomain of blogspot.com along with free unlimited hosting (with an exception of 1GB limit of Picassa for storing images) and the URL of your blog looks like yourblog.blogspot.com

blogging keyboard
But after your blog starts receiving some good amount of readership and starts to grow to a full scale blog, it is not advisable to continue with the free subdomain. There are many disadvantages of subdomains and there are even more advantages of having your own top-level domain name. In my future posts, I am going to discuss those advantages and disadvantages in detail.

For now, I am sure you are reading this because you have already decided to buy a domain name and redirect your blog to it. So in this set of tutorials, I will explain the step by step procedure of setting up a Blogger blog on a custom domain.

Here is a brief summary on what is discussed in the tutorial:
  • Choosing the perfect domain name at the best price
  • Editing CNAME records according to latest update by Blogger.
  • Redirecting old blogspot URL to new domain.
  • Redirecting non-www (naked URL) to www URL.
  • Editing blogger template to replace occurrence of old URL with new URL.
  • Making necessary changes to Feedburner and other services to maintain old records.
I have divided the tutorial in 2 parts:

2. Redirecting your old yourblog.blogspot.com to new yourblog.com and making necessary changes to blog template, to maintain RSS subscribers and other services.

Click on the above links to get to the tutorials. Hope you find it helpful!

Image Credit: Renjith Krishnan/FreeDigitalPhotos.net

Tuesday, 11 September 2012

Optimizing Blogger Post Title With H1 Tags

Heading tags and SEO:

Proper SEO is the first and the major requirement to rank high in Google. One very such very important factor affecting on-site SEO is the use of heading tags. Heading tags rang from H1 to H6 in decreasing order of size and importance given by robots. With a good number of H1, H2 and H3 tags, you can attract robots and get good response from them. How? The following explains it:

Image courtesy to Kromkrathog/FreeDigitalPhotos.net
Suppose you visit a company site. You see a large (not too large!) heading which stated about their latest product release. That large heading attracted your mind, right? Now what if the heading is replaced by a small link. It would remain unnoticed. Same is the case with heading tags used at our blogs. H1 and H2 tags create a feeling of importance to robot bots who visit your site. With a good number of heading tags, the real importance of your site furnishes out. But excessive use of headings can cause side-effects. Your site can be considered as a spam or low quality site if it has innumerable H1 tags.