Showing posts with label Blogger. Show all posts

Wednesday, 17 April 2013

Creating A Blogger (Blogspot) Blog in 3 Minutes

This article is a part of "How to Start a Blog" series.

In the previous article, we had discussed about two of the most preferred blogging platforms for creating a free blog - Blogger and WordPress.com

If you have chosen to start your free blog with Blogger, then for you, this is an article that helps you create a Blogger (Blogspot) blog in just 3 minutes.
Create A Blogger Blog

So lets get started!

Step 1 - Creating a Google Account


Don't worry, it is nothing like a bank account or anything tricky. 

Most of you would already be having an account created by now. Even if you had signed-up for gmail, it means that you have created a Google account that can be used with Blogger too. In this case, skip this step.

If you have never created a Google account, then just go to Blogger.com and click on Sign-up. Fill in the required details and your account would be ready in 1 minute.

Step 2 - Creating a Blogger Profile


Again a simple step.

Just login to Blogger.com with your newly created email id and password. After signing in for the first time, you would get a screen similar to below:

Create A Blogger Blog

This screen lets you decide whether you want to create a Google+ profile or use a limited blogger profile for your blogs. A profile here, is similar to any social networking profile like Facebook or Twitter. It would contain a short bio about you and would contain your photo so that people can know about the author (you) of your blogs.

I recommend anyone to create a Google+ profile here, because it takes just 1 minute and it works as a great platform for sharing your blog and blog articles. You will realize about the importance of Google+ as you continue your blogging career.

Step 3 - Creating The Blog...


OK. So now all the necessary formalities of sign-up are completed and you can start creating your own blogs now.

Create A Blogger Blog

The screenshot above shows the first page that you would run into after logging in. Find the 'New Blog' button on the left side of the screen and click on it.

Create A Blogger Blog

This will open a screen as shown above.

Here, you will have to fill the name of your going-to-be blog and choose a suitable sub-domain for it that is available. The sub-domain along with the '.blogspot.com' would be the web address for your blog. Eg - sampletestblog11.blogspot.com is my chosen web address (screenshot). Tips for choosing a sub-domain would be similar to the tips to choose a domain name for eg - keep it small and clean, easy to remember, related to your topic, etc.

If you have bought a domain name and want to set-up this blog on your custom domain, then also you will have to choose a sub-domain temporarily. And after setting up the blog, you can move your blogger blog to custom domain.

Choose a theme template for your blog (You can change or edit the theme anytime in future) and click on 'Create blog!'

Congrats!

You have created your Blogger blog! And that too within 3 minutes...( If your internet speed favors you ;) )

Now look at the screenshot below:

Create A Blogger Blog

You would get such a screen after successfully creating your Blogger Blog.

Now you can write blog posts on it, edit its template, settings and everything else. Your blog is now ready!

To see how your newly created Blogger blog looks like, just click on the 'View Blog' button shown in the right side of the screen or type your blog's web address on your internet browser's address bar.

So how was it?


Did the article help you? Would you like to share about your blog here?

Fell free to comment and share your views!

And happy blogging...

And do have a look at my "How to Start a Blog" section if you are planning out your first ever blog.

Sunday, 14 April 2013

Blogger vs WordPress.com - Think Before Starting A Free Blog

Blogger and WordPress.com are the two most well known blogging platforms for starting a free blog.

Both of them have their pros and cons and also many differences. If you are planning to start your first ever blog, then there are chances that you are not completely aware of the various blogging platforms you can choose from. 

In this case, to choose the best blogging platform, you need to consider the pros and cons of each platform and according to your needs...Choose the best one.
The Best - Blogger vs WordPress.com
Image Credit - Stuart Miles/FreeDigitalPhotos.net
In the previous article (here), we were discussing about starting a completely free blog, where I mentioned about Blogger and WordPress.com as the most famous free blogging platforms. Both these platforms solve the basic necessity of building a blog - i.e. domain and hosting, by providing free sub-domains and free web space.

Note that we are not discussing about WordPress.org here. WordPress.org is almost completely different that WordPress.com though both of them work on the same core system. To start a blog on WordPress.org, you need to buy both a domain as well as hosting yourself.

Here, we are going to discuss about WordPress.com and Blogger only.

Both these blogging platforms have a huge list of differences which you MUST consider before choosing the best one for yourself.

Let us have a look at the general pros and cons of each of them first.

1. Blogger

BloggerBlogger is a widely used and completely free blogging platform by Google. It provides a free sub-domain of its site, eg. xyz.blogspot.com as well as truly unlimited web space on its own server.

Pros: 

1. Easy to setup and maintain.

2. Truly unconditional unlimited web space.

3. Free sub-domain.

4. No Third Party (or even Google) Ads run on your blog for their profit against your will.

5. 1 GB free images hosting with Picassa which can be extended at a minimal cost. No limit of web space for blog posts though.

6. Can customize your template (blog theme), add new HTML codes and create your own theme without any restriction.

7. Can run HTML as well as Javascript codes on your blog, thus enables use of Google Adsense and other advertising services.

8. Almost 0% chances of your blog getting hacked.

9. Huge collection of free themes available online to give your blog a new fresh look.

10. In-built stats counter to check traffic to your blog. Also Google Analytics (another better traffic stats indicator) can be installed.

Cons:

1. Editing the template requires knowledge of HTML.

2. Psychological effect - Now a days, more and more spam bloggers prefer 'blogger' platform because of its ease of use and so the first look of a blogger blog hosted on free sub-domain raises the impression of spam. 

This effect can easily be removed by buying a domain and shifting your blogger blog to that custom domain. Anyways, talking about starting a blog with zero expense...people prefer the name xyz.wordpress.com than xyz.blogspot.com

3. SEO, i.e. Search Engine Optimization is a term used for the methods used to improve a blog's ranking in search engine result pages. 

No need to worry about this new term yet! 

I am just saying that SEO is a bit more difficult in Blogger than WordPress.com or I must say that it is difficult if you are lazy. Because WordPress.com provides some features for automatic SEO while some of these features are absent in Blogger.

But once you learn the basics of SEO, you can easily optimize your blogger site with little effort.

2. WordPress.com

WordPressWordPress.com is another almost free blogging platform by Automattic. WordPress.com also provides free sub-domain. eg xyz.wordpress.com and a limited amount of free web space.


Pros:

1. Easy to setup and maintain.

2. Free sub-domain.

3. 3GB free web space that includes space for your blog posts as well as images.

4. Easier, direct and automatic SEO compared to Blogger.

5. Highly secure system with very rare chances of getting hacked.

Cons:

1. Did you notice that I have underlined the word 'almost' in the first paragraph about WordPress.com? That is because most of its features are free up-to a limit and also, there are some extra features which are not compulsory, are available by paying some annual price.

2. 3GB of web space, which can be extended at a cost starting from $20/year.

3. You cannot modify the CSS used on your blog, thus disabling you from making changes to the design of your blog.

4. You cannot add any plugin or HTML/Javascript code to your blog. Thus no Adsense, no Analytics. Though advertisement can be enabled if your blog receives more than 25000 traffic/month by using a feature called Ad control where you have to share 50% of your income to it.

5. Third party ads seldom run on your blog by WordPress.com for their profit. Disabling these ads require a feature costing $29.97/year

6. Can't use your own theme. You have to choose a theme from the list of about 200 themes provided by WordPress.com itself. Not a large problem though.

Conclusion For Blogger vs WordPress.com

If you are just looking for the best platform for building a small blog without any big future idea for it, then both Blogger and WordPress.com can offer you the basic platform to start your blog.

If you have some future ideas of building a larger blog with an eye on monetizing it, go for Blogger.

And if you are looking for a more professional blog with large scale ideas...then consider investing some money on your blog and avoid a free sub-domain. In this case, remove WordPress.com completely from your mind and think about only Blogger and WordPress.org. 

Over to you!

Planning to start a blog on any of these two blogging platforms?

Which one did you decide? Blogger or WordPress.com?

Do comment and let us know.

And do remind me if I missed something in this article, OK?

Happy Blogging!

Monday, 5 November 2012

How to Redirect Blogspot Blog to Custom Domain

redirecting blog

This is the second part of my tutorial on setting up a blogger blog on custom domain.

Read the first part here: Setting up Custom domain for Blogger.

In this part, I am going to guide you to on redirecting your old blogspot.com blog to your custom domain.
Eg: From yourblog.blogspot.com to yourblog.com

Second, I will guide you in redirecting naked URL (non www URL) to the www URL. Then I will guide you in updating your site links and other services to work with the new domain. I hope you have followed the part one and set up the CNAME and A records you need for your blogger blog to work on the custom domain.

Redirecting Blog to Custom Domain

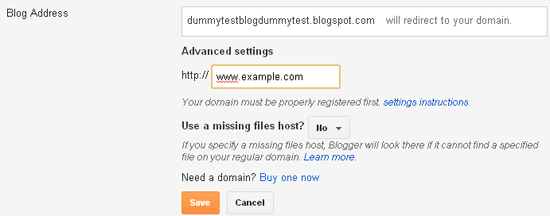
  1. Go to Blogger dashboard > Settings > Basic > Publishing > Blog address
  2. Click on 'Add a custom domain' > 'Switch to Advanced Settings'
  3. Enter your domain name with a 'www' as shown in the screenshot below. Eg- www.example.com
Redirecting Blog to Custom Domain screenshot

Set the 'Use a missing files host?' option to no. Select save and you are done!

Redirecting Naked URL to 'www' URL

Naked URL is the URL that doesn't contain a 'www' in it. Suppose you have registered a domain named example.com and then by following the above method, you set up your blog on that domain. Then there is still one problem left to solve. Because after successfully setting up your blog on custom domain, you can access your blog by the URL: www.example.com but if you enter the URL as just example.com then it would show a 404 error.

There are many users who do not enter the 'www' prefix and so they will not land on your blog, but will land on a 404 error page. To solve this problem, we need to redirect the non-www URL (known as naked URL) to the www URL.

Follow these steps to redirect the naked URL to the correct URL.
  1. Again go to Blogger dashboard > Settings > Basic > Publishing > Blog address
  2. Click on Edit > Check the option 'Redirect yourblog.com to www.yourblog.com'
Click on save. That's it!

Editing Site Links and other Services

After redirecting your blog to custom domain, the internal links within your blog do not change automatically. You need to change them manually.
  1. Check for internal links on any blog post and correct it.
  2. Open you blog's HTML template and search for your old blogspot.com links and manually change them to the new link with the 'www' prefix.
One important service that most of you would be using on your blog is Feedburner. Go to feeds.feedburner.com and edit your feed settings to the new blog address and the new blog's RSS address.

I should also remind you about some other places where possibly you have placed a link to your blog.
  1. Facebook/Twitter/LinkedIn or other social networking sites.
  2. Forum signatures.
  3. Reciprocal link exchanges. You can send an email to the other blog owner to update the link.
You won't be able to edit commentluv comment links on other blogs. But don't worry about it because the old blogspot.com links would be redirected to the new blog's address. Also in a few days, after Google re-indexes your new blog's URL, you will get back all the backlinks even if they link to the old blogspot.com blog.
In this process, you will lose your PR and Alexa rank but you will eventually gain them back without any special efforts.

Image credit: sheelamohan/FreeDigitalPhotos.net

Over to you!

Did the tutorial help you? Or do you have any doubts on this process? I would love to hear from you so do leave a comment.

Saturday, 3 November 2012

Setting up a Custom Domain for Blogger

This is the first part of my 2 section tutorial on setting up a blogger blog on custom domain. In this part I have discussed how to set up A records and CNAME records for the custom domain to use it for your blogspot blog according to the newly updated features and settings by Blogger.

After buying a custom domain for your blog, the next step is to set up CNAME and A records for it. Recently (in October 2012) Blogger had faced some issues regarding mapping a custom domain for its blogspot users and after that, they had introduced a new CNAME record to verify the ownership of domain.

OK. So let us move on to these settings. I have divided the settings in 2 parts. The first part is divided into two parts according to your registrant. That is because in Godaddy, these settings are easier compared to other registrants. The second part deals with the 2nd CNAME record required as per latest update by Blogger.

Part 1: Setting A records and 1st required CNAME record


Option 1: For domains registered through Godaddy:

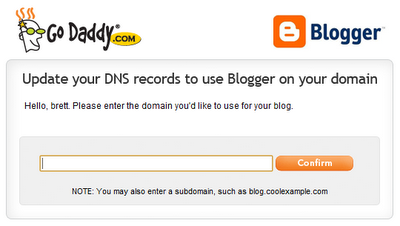
Go to your account domain setting tool and enter the domain name you want to set up for blogger as shown in the figure below. In 10-15 minutes, the account will be half ready for blogger.
Godaddy domain setting tool for Blogger
I said half ready because still there is one more CNAME record remaining to add. Now jump to Part 2.

Option 2: For domains registered through Namecheap, name.com or other registrants:

For other registrants, you will have to manually set up A records and CNAME records.

These are the required A records:
@     216.239.32.21     1800
@     216.239.34.21     1800
@     216.239.36.21     1800
@     216.239.38.21     1800
Here 1800 is the TTL (Time to live)

And this is the 1st CNAME record you need to enter:
www     ghs.google.com

Now move to Part 2 to create the 2nd required CNAME record

Part 2: Setting 2nd required CNAME record

Go to: Blogger Dashboard > Settings > Basic > Blog Address > Add a custom domain

Now click on 'Switch to advanced settings'.

New CNAME Record Settings for Blogger

Enter your domain name with www like www.example.com (as shown above). Now click on settings instructions.

You will be taken to a page of instructions. First select 'On a top-level domain (www.example.com)' option. Now find the second CNAME record details and note it.

CNAME records blogger

Now open your registrant and go to account domain settings and manually enter the 2nd CNAME record as given in the instructions page. Note that in some registrants like Godaddy there is no need to (and you cannot) add the last dot (.) given in the CNAME destination eg "xyzabc.domainverify.googlehosted.com." There is no need to add the last dot so just type "xyzabc.domainverify.googlehosted.com" in the CNAME destination.

Congrats! You have completed the required tasks to set up a custom domain for blogger. Now wait for nearly one hour for the settings to show their results and then move to the next step of setting up blogger on custom domain.

Read the second part of the turorial: How to Redirect Blogspot Blog to Custom Domain

Tuesday, 30 October 2012

How to Set up a Blogger Blog on Custom Domain

As we all know, Google's Blogger (also called Blogspot) is an extremely easy to set up and easy to manage free blogging platform. After WordPress, Blogger is the most famous platform for blogging. A lot of new bloggers on their first try at blogging, create a free blogger blog.

There are many advantages as well as few disadvantages of using Blogger as a platform instead of WordPress. When you start a blog with Blogger, you get a free subdomain of blogspot.com along with free unlimited hosting (with an exception of 1GB limit of Picassa for storing images) and the URL of your blog looks like yourblog.blogspot.com

blogging keyboard
But after your blog starts receiving some good amount of readership and starts to grow to a full scale blog, it is not advisable to continue with the free subdomain. There are many disadvantages of subdomains and there are even more advantages of having your own top-level domain name. In my future posts, I am going to discuss those advantages and disadvantages in detail.

For now, I am sure you are reading this because you have already decided to buy a domain name and redirect your blog to it. So in this set of tutorials, I will explain the step by step procedure of setting up a Blogger blog on a custom domain.

Here is a brief summary on what is discussed in the tutorial:
  • Choosing the perfect domain name at the best price
  • Editing CNAME records according to latest update by Blogger.
  • Redirecting old blogspot URL to new domain.
  • Redirecting non-www (naked URL) to www URL.
  • Editing blogger template to replace occurrence of old URL with new URL.
  • Making necessary changes to Feedburner and other services to maintain old records.
I have divided the tutorial in 2 parts:

2. Redirecting your old yourblog.blogspot.com to new yourblog.com and making necessary changes to blog template, to maintain RSS subscribers and other services.

Click on the above links to get to the tutorials. Hope you find it helpful!

Image Credit: Renjith Krishnan/FreeDigitalPhotos.net