This is the second part of my tutorial on setting up a blogger blog on custom domain.
Read the first part here: Setting up Custom domain for Blogger.
In this part, I am going to guide you to on redirecting your old blogspot.com blog to your custom domain.
Eg: From yourblog.blogspot.com to yourblog.com
Second, I will guide you in redirecting naked URL (non www URL) to the www URL. Then I will guide you in updating your site links and other services to work with the new domain. I hope you have followed the part one and set up the CNAME and A records you need for your blogger blog to work on the custom domain.
Redirecting Blog to Custom Domain
- Go to Blogger dashboard > Settings > Basic > Publishing > Blog address
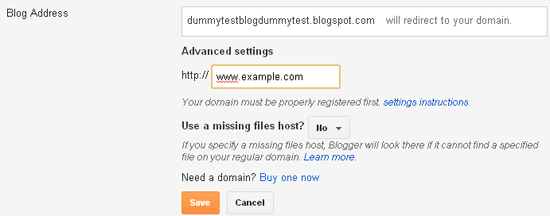
- Click on 'Add a custom domain' > 'Switch to Advanced Settings'
- Enter your domain name with a 'www' as shown in the screenshot below. Eg- www.example.com

Set the 'Use a missing files host?' option to no. Select save and you are done!
Redirecting Naked URL to 'www' URL
Naked URL is the URL that doesn't contain a 'www' in it. Suppose you have registered a domain named example.com and then by following the above method, you set up your blog on that domain. Then there is still one problem left to solve. Because after successfully setting up your blog on custom domain, you can access your blog by the URL: www.example.com but if you enter the URL as just example.com then it would show a 404 error.
There are many users who do not enter the 'www' prefix and so they will not land on your blog, but will land on a 404 error page. To solve this problem, we need to redirect the non-www URL (known as naked URL) to the www URL.
Follow these steps to redirect the naked URL to the correct URL.
- Again go to Blogger dashboard > Settings > Basic > Publishing > Blog address
- Click on Edit > Check the option 'Redirect yourblog.com to www.yourblog.com'
Click on save. That's it!
Editing Site Links and other Services
After redirecting your blog to custom domain, the internal links within your blog do not change automatically. You need to change them manually.
- Check for internal links on any blog post and correct it.
- Open you blog's HTML template and search for your old blogspot.com links and manually change them to the new link with the 'www' prefix.
I should also remind you about some other places where possibly you have placed a link to your blog.
- Facebook/Twitter/LinkedIn or other social networking sites.
- Forum signatures.
- Reciprocal link exchanges. You can send an email to the other blog owner to update the link.
In this process, you will lose your PR and Alexa rank but you will eventually gain them back without any special efforts.
Image credit: sheelamohan/FreeDigitalPhotos.net
Over to you!
Did the tutorial help you? Or do you have any doubts on this process? I would love to hear from you so do leave a comment.


