Showing posts with label Domain. Show all posts

Thursday, 11 April 2013

Top 3 Reliable And Affordable Domain Registrars

My previous article dealt with some tips to consider before buying a domain name. Now that you have chosen the perfect domain name for your blog you would be looking for the perfect domain registrar.

Domain Registration

A domain registrar is a company that lets you buy and register a domain name. All such domain registrars charge a certain fixed amount of money for registering the domain for you. A domain is registered on a "per year" scale. You can register a domain for 1 or 2 years or even 10 years. Even if you register a domain for only 1 year, you can renew your registration for next years anytime from the same domain registrar which also costs a certain charge on a "per year" scale.

I hope this clears the concept.

Also read about the scams related to free domain registrations. Don't fall for these scams!

So now without wasting time, let me introduce you to the 3 most well known, reliable and at the same time affordable domain registrars.

The domain prices are subject to change very frequently and some of these 3 registrars mentioned below are famous for providing festive discounts throughout the year :) Thus mentioning the domain prices today would be useless for tomorrow. So I have not mentioned the current prices for registering domains through these registrar sites. But I assure you all that these 3 registrars are the most affordable and reliable ones.

1. Godaddy

Godaddy
Personally I prefer Godaddy the most. All my domains are registered through Godaddy and they have never provided me any chance for complaining.

Also there are many Godaddy promo codes available throughout the net that gift you with great discounts of upto even 80%.

Godaddy also offers other paid services like SSL certificate, WhoIsGuard and many more. All these services are optional but one can consider buying them if they can afford a few extra dollars per year. Godaddy is considered the largest domain registrar for present.

Check out domains by Godaddy here.

2. Name.com

Name.com
Name.com is another reliable domain registrar that has been in this field from several years.

Name.com also provides extra services like SSL certificate,etc at an extra cost. This registrar can be considered as another affordable one.

3. Namecheap.com

Namecheap
As the name suggests, Namecheap is a real expert in providing domains at comparatively low price. At the time of writing, Namecheap provided registrations of .com domain for just $3.95 (This figure is subject to change anytime) while the above two cost about $9-10 for the same.

Along with the cheap price, Namecheap is also a reliable domain registrar used by many people out there. Namecheap also provides services like SSL certificate, WhoIsGuard, etc.

What do you say about these registrars?

How many of you have registered a domain before? Did you register it from any of these registrar sites or from some other site not mentioned here?

Do let us know your experience with your domain registrar and share your views with us!

Image credit- Stuart Miles/FreeDigitalPhotos.net

9 Tips to Choose The Best Domain Name

This article is a part of the "How to Start a Blog" set of tutorials for beginners.

Choosing the perfect domain name is the first and most important step in pro blogging. And getting your hands on the best available domain is a very difficult task. Today, with millions of websites online, it becomes very hard to get the domain name you like.

finding domain
I would suggest anyone to buy a domain from godaddy.com because of the following reasons:
  • Cheapest domain name registration
  • Promo coupons and discounts
  • Easy to set up CNAME records for Blogger
  • Good customer support
These reasons are enough I guess? You can always get a promo coupon by doing a Google search for them. These promo coupons let you buy your .com/.net/.org or any other domain at a much cheaper price. When I registered Blogging Panorama, I got it for $2.95 only.

And one line of recommendation from my side: NEVER go for free subdomains like .co.cc or .tk. If you are serious about your blog, then buy a domain and as I said earlier, you can get one for as low as $2.95 (by using Godaddy promo coupons)

Also read: Top 3 Affordable Domain Registrars

While looking for the best available domain name, always consider these 9 tips:
  1. Keep the domain name related to your blog's niche. And avoid using your own name as domain name unless you site would be a personal blog or you are going to share personal success stories. Though there are good examples of blogs with domain name the same as the name of their owners like ZacJohnson.com. But you should consider your blog's niche more than your own name.
  2. Do check if the name you are interested in buying is a trademark of any existing company. You should never do a mistake of registering a domain name which contains any commercial company's trademark in it. They may register a complaint against your registration and it can lead to the end of your domain. For example you cannot use 'WordPress' in your domain name because it is against their permission. Also you can't use any offensive word from any language in your domain name.
  3. Try to keep your domain name understandable and short. I give more preference to 'understandable' than 'short' because it is more important that your visitors remember your site's address than they remember a random phrase like 'mpvr.com' and even if your domain name is 10-15 characters long but it is understandable and related to your blog's content, the search engines won't mind the long domain name.
  4. AVOID exact keyword match domain because they are getting penalized by Google thanks to their latest algorithm updates.
  5. Check if a similar name is already on the first page of Google. For example if you are thinking about the name 'TechyPC' then do a search for the words techy and PC. Suppose if there is a site with a name 'TechyGuy' or something very near to your interested name, then drop the idea. You won't want to compete with the other site to get on top of Google from the very first day of your registration.
  6. Look for the domain name that matches your site's name like bloggingpanorama.com for 'Blogging Panorama'. Though there are some blogs who have different site name and domain name. One of them is Digital Inspiration (labnol.org)
  7. Give more preference to .com/.net/.org than to .info/.co/.us/.uk/.in or any other country-TLD. Country TLDs are not good for global SEO as they tend to target only a specific geographic region.
  8. Buying an old domain can be benefitial in some cases. Old domains have are more trusted by Google and can rank easier with all those ready made backlinks and traffic. Though today, the meaning of SEO is changing and it doesn't matter very much, but still it can be a little benefit. But be sure to check that the domain was used for the right purposes and was not blacklisted or banned from Adsense.
  9. Check the existing PR and Alexa Rank of the domain if you are buying an old domain. Also check Internet Archive to find out how the domain was used earlier.
So these were my 9 tips to choosing the best domain name. Do you have any more suggestions? Do comment and let me know.

Image credit: Digitalart/FreeDigitalPhotos.net

This article is a part of the "How to Start a Blog" set of tutorials. Do read the remaining parts :)

Monday, 5 November 2012

How to Redirect Blogspot Blog to Custom Domain

redirecting blog

This is the second part of my tutorial on setting up a blogger blog on custom domain.

Read the first part here: Setting up Custom domain for Blogger.

In this part, I am going to guide you to on redirecting your old blogspot.com blog to your custom domain.
Eg: From yourblog.blogspot.com to yourblog.com

Second, I will guide you in redirecting naked URL (non www URL) to the www URL. Then I will guide you in updating your site links and other services to work with the new domain. I hope you have followed the part one and set up the CNAME and A records you need for your blogger blog to work on the custom domain.

Redirecting Blog to Custom Domain

  1. Go to Blogger dashboard > Settings > Basic > Publishing > Blog address
  2. Click on 'Add a custom domain' > 'Switch to Advanced Settings'
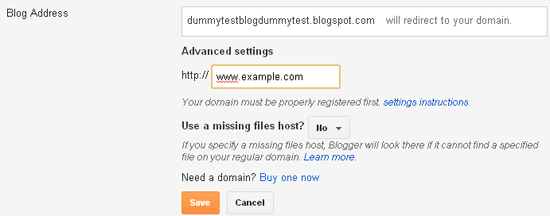
  3. Enter your domain name with a 'www' as shown in the screenshot below. Eg- www.example.com
Redirecting Blog to Custom Domain screenshot

Set the 'Use a missing files host?' option to no. Select save and you are done!

Redirecting Naked URL to 'www' URL

Naked URL is the URL that doesn't contain a 'www' in it. Suppose you have registered a domain named example.com and then by following the above method, you set up your blog on that domain. Then there is still one problem left to solve. Because after successfully setting up your blog on custom domain, you can access your blog by the URL: www.example.com but if you enter the URL as just example.com then it would show a 404 error.

There are many users who do not enter the 'www' prefix and so they will not land on your blog, but will land on a 404 error page. To solve this problem, we need to redirect the non-www URL (known as naked URL) to the www URL.

Follow these steps to redirect the naked URL to the correct URL.
  1. Again go to Blogger dashboard > Settings > Basic > Publishing > Blog address
  2. Click on Edit > Check the option 'Redirect yourblog.com to www.yourblog.com'
Click on save. That's it!

Editing Site Links and other Services

After redirecting your blog to custom domain, the internal links within your blog do not change automatically. You need to change them manually.
  1. Check for internal links on any blog post and correct it.
  2. Open you blog's HTML template and search for your old blogspot.com links and manually change them to the new link with the 'www' prefix.
One important service that most of you would be using on your blog is Feedburner. Go to feeds.feedburner.com and edit your feed settings to the new blog address and the new blog's RSS address.

I should also remind you about some other places where possibly you have placed a link to your blog.
  1. Facebook/Twitter/LinkedIn or other social networking sites.
  2. Forum signatures.
  3. Reciprocal link exchanges. You can send an email to the other blog owner to update the link.
You won't be able to edit commentluv comment links on other blogs. But don't worry about it because the old blogspot.com links would be redirected to the new blog's address. Also in a few days, after Google re-indexes your new blog's URL, you will get back all the backlinks even if they link to the old blogspot.com blog.
In this process, you will lose your PR and Alexa rank but you will eventually gain them back without any special efforts.

Image credit: sheelamohan/FreeDigitalPhotos.net

Over to you!

Did the tutorial help you? Or do you have any doubts on this process? I would love to hear from you so do leave a comment.

Saturday, 3 November 2012

Setting up a Custom Domain for Blogger

This is the first part of my 2 section tutorial on setting up a blogger blog on custom domain. In this part I have discussed how to set up A records and CNAME records for the custom domain to use it for your blogspot blog according to the newly updated features and settings by Blogger.

After buying a custom domain for your blog, the next step is to set up CNAME and A records for it. Recently (in October 2012) Blogger had faced some issues regarding mapping a custom domain for its blogspot users and after that, they had introduced a new CNAME record to verify the ownership of domain.

OK. So let us move on to these settings. I have divided the settings in 2 parts. The first part is divided into two parts according to your registrant. That is because in Godaddy, these settings are easier compared to other registrants. The second part deals with the 2nd CNAME record required as per latest update by Blogger.

Part 1: Setting A records and 1st required CNAME record


Option 1: For domains registered through Godaddy:

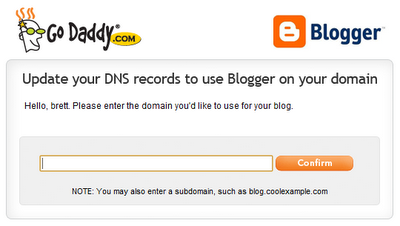
Go to your account domain setting tool and enter the domain name you want to set up for blogger as shown in the figure below. In 10-15 minutes, the account will be half ready for blogger.
Godaddy domain setting tool for Blogger
I said half ready because still there is one more CNAME record remaining to add. Now jump to Part 2.

Option 2: For domains registered through Namecheap, name.com or other registrants:

For other registrants, you will have to manually set up A records and CNAME records.

These are the required A records:
@     216.239.32.21     1800
@     216.239.34.21     1800
@     216.239.36.21     1800
@     216.239.38.21     1800
Here 1800 is the TTL (Time to live)

And this is the 1st CNAME record you need to enter:
www     ghs.google.com

Now move to Part 2 to create the 2nd required CNAME record

Part 2: Setting 2nd required CNAME record

Go to: Blogger Dashboard > Settings > Basic > Blog Address > Add a custom domain

Now click on 'Switch to advanced settings'.

New CNAME Record Settings for Blogger

Enter your domain name with www like www.example.com (as shown above). Now click on settings instructions.

You will be taken to a page of instructions. First select 'On a top-level domain (www.example.com)' option. Now find the second CNAME record details and note it.

CNAME records blogger

Now open your registrant and go to account domain settings and manually enter the 2nd CNAME record as given in the instructions page. Note that in some registrants like Godaddy there is no need to (and you cannot) add the last dot (.) given in the CNAME destination eg "xyzabc.domainverify.googlehosted.com." There is no need to add the last dot so just type "xyzabc.domainverify.googlehosted.com" in the CNAME destination.

Congrats! You have completed the required tasks to set up a custom domain for blogger. Now wait for nearly one hour for the settings to show their results and then move to the next step of setting up blogger on custom domain.

Read the second part of the turorial: How to Redirect Blogspot Blog to Custom Domain

Tuesday, 30 October 2012

How to Set up a Blogger Blog on Custom Domain

As we all know, Google's Blogger (also called Blogspot) is an extremely easy to set up and easy to manage free blogging platform. After WordPress, Blogger is the most famous platform for blogging. A lot of new bloggers on their first try at blogging, create a free blogger blog.

There are many advantages as well as few disadvantages of using Blogger as a platform instead of WordPress. When you start a blog with Blogger, you get a free subdomain of blogspot.com along with free unlimited hosting (with an exception of 1GB limit of Picassa for storing images) and the URL of your blog looks like yourblog.blogspot.com

blogging keyboard
But after your blog starts receiving some good amount of readership and starts to grow to a full scale blog, it is not advisable to continue with the free subdomain. There are many disadvantages of subdomains and there are even more advantages of having your own top-level domain name. In my future posts, I am going to discuss those advantages and disadvantages in detail.

For now, I am sure you are reading this because you have already decided to buy a domain name and redirect your blog to it. So in this set of tutorials, I will explain the step by step procedure of setting up a Blogger blog on a custom domain.

Here is a brief summary on what is discussed in the tutorial:
  • Choosing the perfect domain name at the best price
  • Editing CNAME records according to latest update by Blogger.
  • Redirecting old blogspot URL to new domain.
  • Redirecting non-www (naked URL) to www URL.
  • Editing blogger template to replace occurrence of old URL with new URL.
  • Making necessary changes to Feedburner and other services to maintain old records.
I have divided the tutorial in 2 parts:

2. Redirecting your old yourblog.blogspot.com to new yourblog.com and making necessary changes to blog template, to maintain RSS subscribers and other services.

Click on the above links to get to the tutorials. Hope you find it helpful!

Image Credit: Renjith Krishnan/FreeDigitalPhotos.net

Monday, 10 September 2012

Top 3 Free Domain Registration Services

Are looking about how you can set up your own website for free? Yes? And you came to know about these well known free domain registration services, right? But right before jumping into one of them, here is something that you should read about them first...
www
Image courtesy of jscreationzs/FreeDigitalPhotos.net
Recently one of my friends who owns a well known blog on blogger platform decided to move to WordPress and that too at zero cost. 'Zero cost', he decided after he came to know about some free domain registration services. I am going to tell about the said-so 'best' services and one of them, my friend accepted. After creating a WordPress blog at a domain registered at .co.cc , he worked on that blog for weeks, but he never his blog indexed at Google. Anyone would get worried about their success if something like this would happen. And so while searching for a solution for him, I found that Google had banned all .co.cc domains from their index...

Also read: 9 Tips to Choose the Best Domain Name